
Navigating My Courses
Navigating My Courses
Learn more about My Courses by reading the directions below or by watching the video.
%20(21).gif)
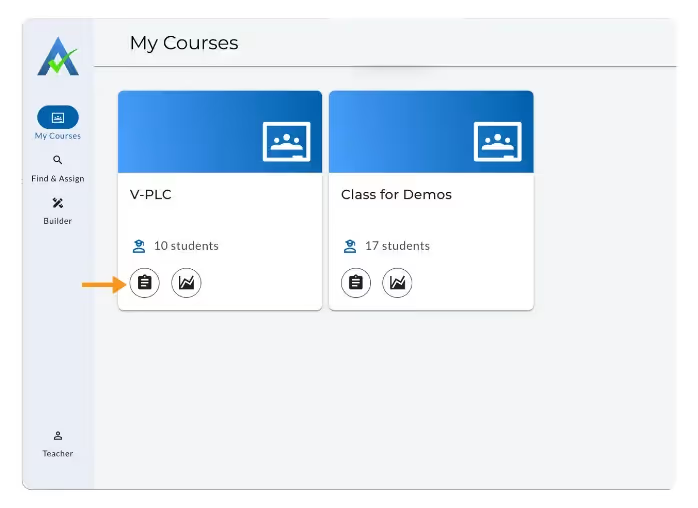
When teachers log in, they arrive on the My Courses homepage, the new starting point for navigating classes in ASSISTments.
Each Class Card displays the class name, student count, and quick-access icons — the clipboard for Assignments and the graph for Reports.
Teachers can still access Find & Assign from the left-hand navigation menu to browse and assign new content.
From a Class Card, you can access:
- Assignments (a) – Opens the Assignment List for that class, where you can view and manage assignments.
- Reports (b) – Navigates to the Class Report for that class, where you can review student performance data.
Importing Classes
New to ASSISTments:
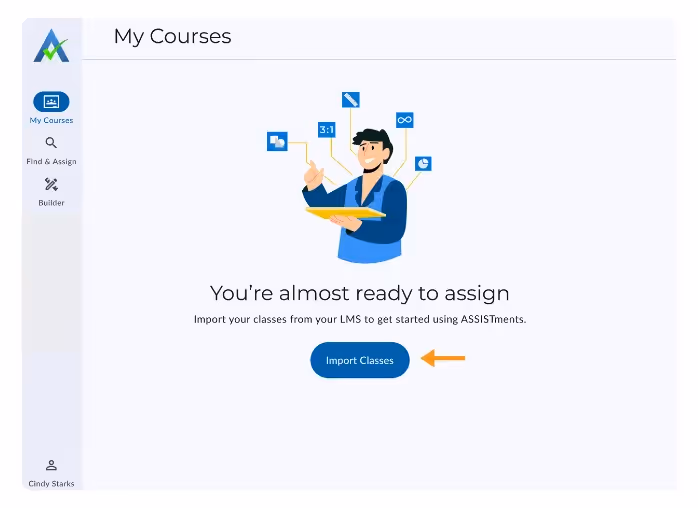
When you sign in, you will receive a message to ‘Import Classes’ on the My Courses homepage.
- Click on 'Import Classes’.
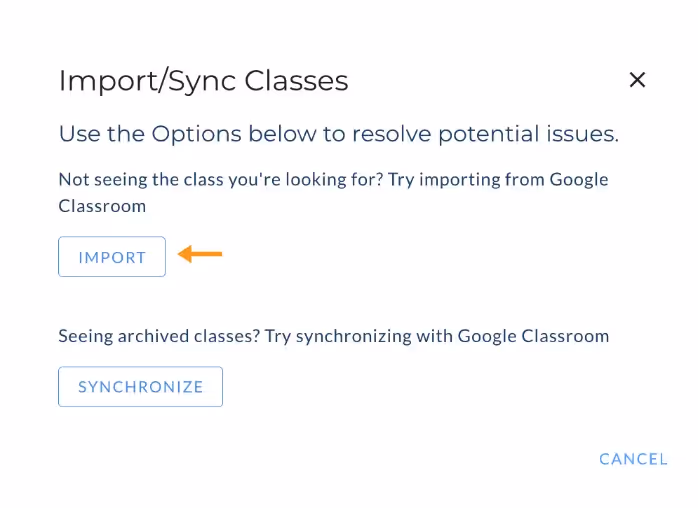
- Select ‘Import’.
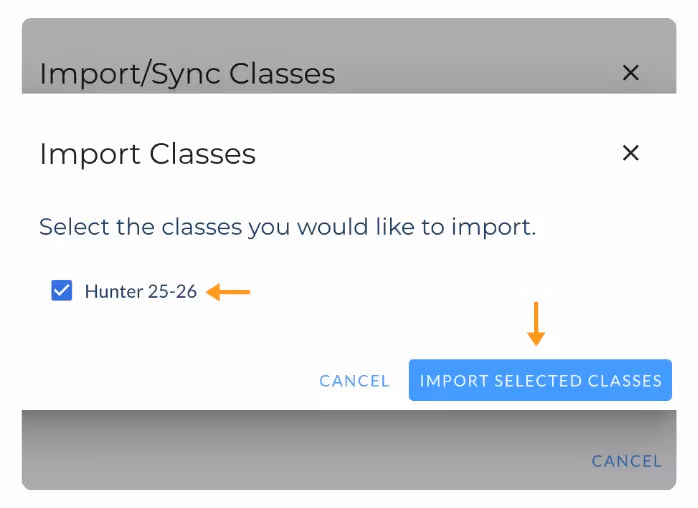
- Select the class or classes you wish to import.
- Click Import Selected Classes.
You are now ready to assign ASSISTments content to students through ‘Find & Assign’.
Existing ASSISTments Accounts
When you log in, your existing imported classes will already be visible as Class Cards. You can still import additional classes when creating an assignment or through your Teacher Preferences.
Find & Assign
This is where you can find the problems that you want to assign by using the content library to browse content by curriculum or search by Common Core standard.
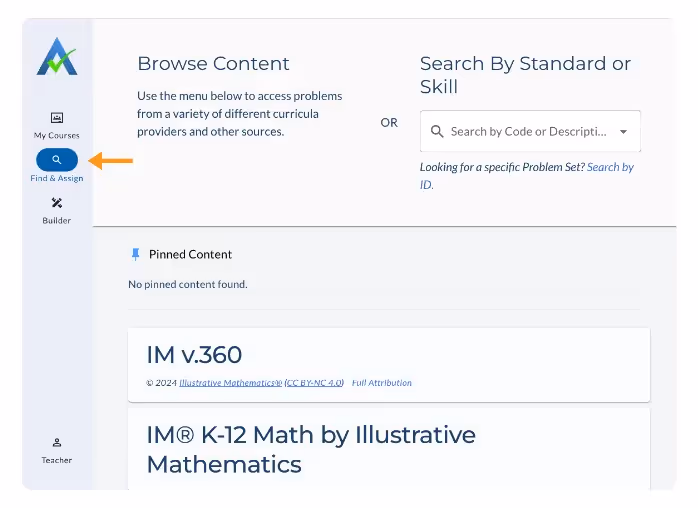
From here, you can:
- Browse available content and curriculum.
- Assign content to students
Note: Find & Assign is no longer the homepage. It is now located in the second tab under 'My Courses'.
Learn how to create an assignment here.
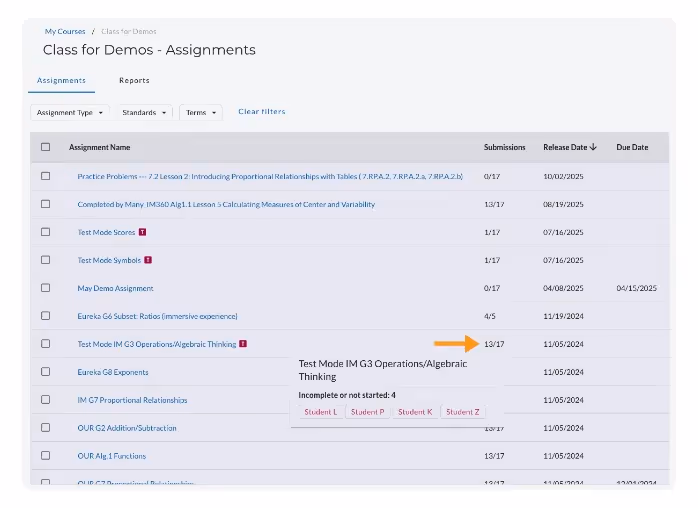
Viewing Assignments in My Courses
When you click the Assignment Icon from the My Courses homepage, you’ll be taken to the Assignments List. This page shows all the assignments you’ve created for that class.
Assignments List Overview

The Assignments List provides:
- Assignment name
- Number of student submissions
- Release date
- Due date (if you set one)
Filter by Assignment Type
Teachers can easily filter the assignments by assignment type, standards, and/or terms.
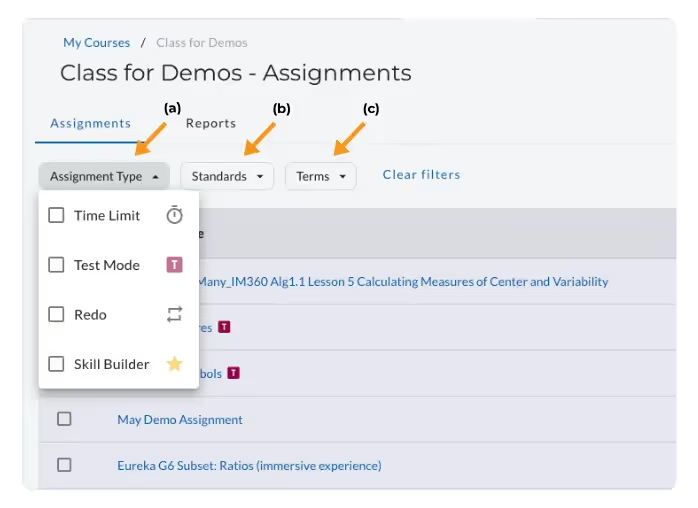
- Assignment type (a):
- Time Limit
- Test Mode
- Redo
- Skill Builder
- Standards (b)
- Terms (c)
- Terms can be set in Teacher Preferences
Submissions Feature
When hovering over the Submissions column, a tooltip appears showing the names of students who have not completed the assignment. This allows teachers to quickly identify outstanding work without opening the report.
Bulk Upload
When a teacher selects one or more assignments on the Assignments List, they can upload the assignment data from all selected assignments to the connected LMS.
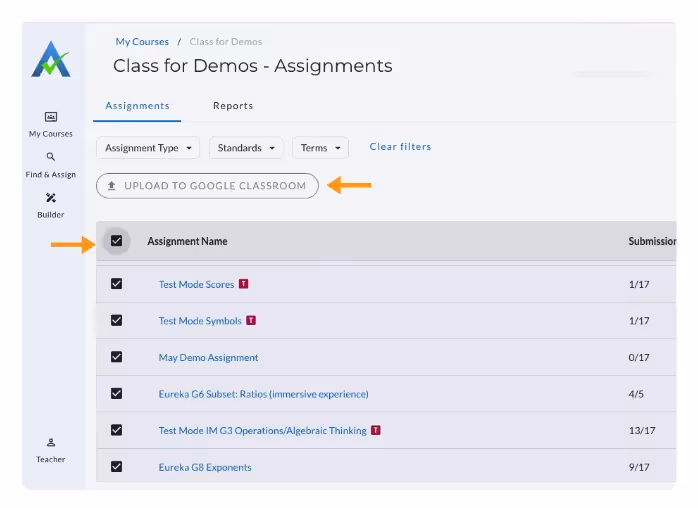
- From the Assignments List, check the box next to one or more assignments.
- Select Upload to Name of LMS (Canvas, Google Classroom, Schoology, etc).
- Confirm the upload. Th selected assignment scores will sync to the connected LMS (Canvas, Google Classroom, Schoology, etc).
Viewing Reports in My Courses
When you click the Report Icon from the My Courses homepage, you’ll be taken to the Class Report. This page shows student performance across all assignments in that class.
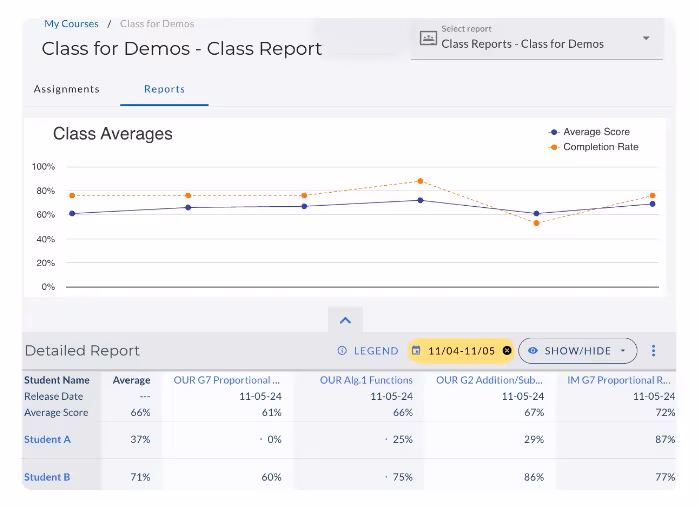
The Class Report gives you a snapshot of how your students are doing across all assignments. You’ll see:
- Class Averages Graph – A line graph displaying the average scores in blue and completion rates in orange, for each assignment.
- Detailed Report – A breakdown of student performance across all assignments.
From the Class Report, you can:
- Click on an assignment name to open the Assignment Report for that assignment. Learn more about the Assignment Report.
- Click on a student’s name to open their Student Progress Report.
Teacher Preferences
Teachers can customize their settings by accessing their Teacher Preferences.
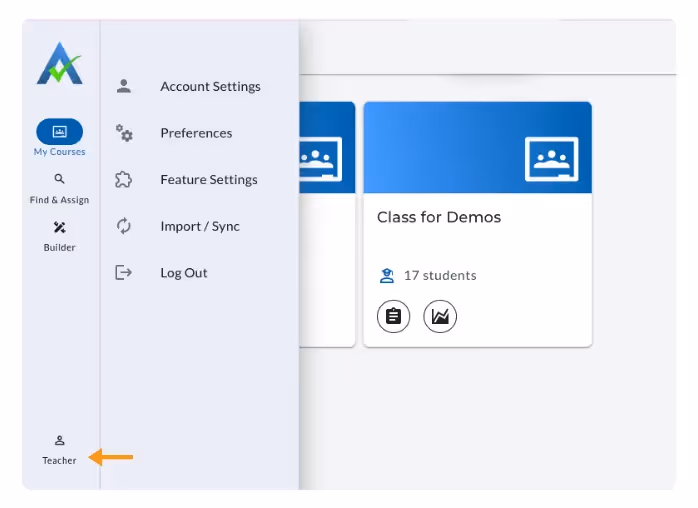
- Account Settings: update personal information
- Preferences: update time zone, school zip code, curriculum, grade preferences, state standards, and school terms.
- Feature Settings: set defaults for Test Mode, Student Supports, and Student Score Delivery.
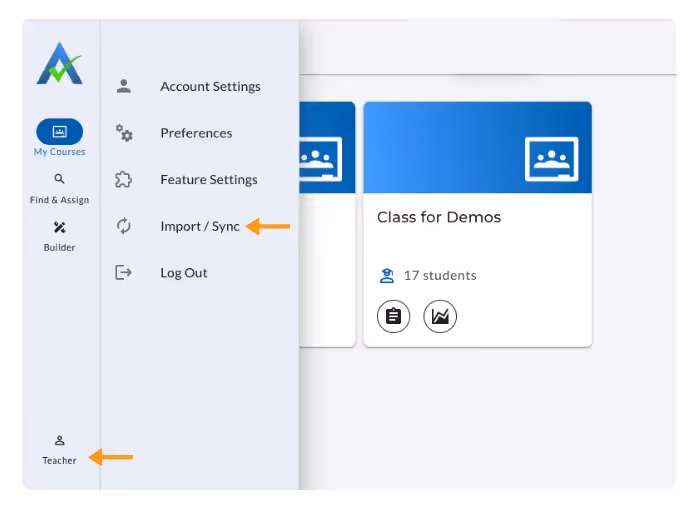
- Import & Sync: import or synchronize your classes with your LMS.
Learn more about updating Teacher Preferences here.
Frequently Asked Questions
Q: I don’t see my Class Card(s)—what should I do?
A: Click Import Classes on the My Courses homepage by clicking your name in the lower left-hand corner to access Import/Sync. You can also synchronize your LMS connection to ensure all courses are visible.
Q: Where do I find assignments now that the interface has changed?
A: Assignments are now located inside each course. Click the Assignment Icon on the Class Card to view Assignments.
Q: How do I view reports for individual students?
A: Click the Report Icon on the Class Card to open Class Reports. From there, select a student to access the Student Detail Report.
Navigating My Courses
Learn more about My Courses by reading the directions below or by watching the video.
When teachers log in, they arrive on the My Courses homepage, the new starting point for navigating classes in ASSISTments.
Each Class Card displays the class name, student count, and quick-access icons — the clipboard for Assignments and the graph for Reports.
Teachers can still access Find & Assign from the left-hand navigation menu to browse and assign new content.
From a Class Card, you can access:
- Assignments (a) – Opens the Assignment List for that class, where you can view and manage assignments.
- Reports (b) – Navigates to the Class Report for that class, where you can review student performance data.
Importing Classes
New to ASSISTments:
When you sign in, you will receive a message to ‘Import Classes’ on the My Courses homepage.
- Click on 'Import Classes’.
- Select ‘Import’.
- Select the class or classes you wish to import.
- Click Import Selected Classes.
You are now ready to assign ASSISTments content to students through ‘Find & Assign’.
Existing ASSISTments Accounts
When you log in, your existing imported classes will already be visible as Class Cards. You can still import additional classes when creating an assignment or through your Teacher Preferences.
Find & Assign
This is where you can find the problems that you want to assign by using the content library to browse content by curriculum or search by Common Core standard.
From here, you can:
- Browse available content and curriculum.
- Assign content to students
Note: Find & Assign is no longer the homepage. It is now located in the second tab under 'My Courses'.
Learn how to create an assignment here.
Viewing Assignments in My Courses
When you click the Assignment Icon from the My Courses homepage, you’ll be taken to the Assignments List. This page shows all the assignments you’ve created for that class.
Assignments List Overview
The Assignments List provides:
- Assignment name
- Number of student submissions
- Release date
- Due date (if you set one)
Filter by Assignment Type
Teachers can easily filter the assignments by assignment type, standards, and/or terms.
- Assignment type (a):
- Time Limit
- Test Mode
- Redo
- Skill Builder
- Standards (b)
- Terms (c)
- Terms can be set in Teacher Preferences
Submissions Feature
When hovering over the Submissions column, a tooltip appears showing the names of students who have not completed the assignment. This allows teachers to quickly identify outstanding work without opening the report.
Bulk Upload
When a teacher selects one or more assignments on the Assignments List, they can upload the assignment data from all selected assignments to the connected LMS.
- From the Assignments List, check the box next to one or more assignments.
- Select Upload to Name of LMS (Canvas, Google Classroom, Schoology, etc).
- Confirm the upload. Th selected assignment scores will sync to the connected LMS (Canvas, Google Classroom, Schoology, etc).
Viewing Reports in My Courses
When you click the Report Icon from the My Courses homepage, you’ll be taken to the Class Report. This page shows student performance across all assignments in that class.
The Class Report gives you a snapshot of how your students are doing across all assignments. You’ll see:
- Class Averages Graph – A line graph displaying the average scores in blue and completion rates in orange, for each assignment.
- Detailed Report – A breakdown of student performance across all assignments.
From the Class Report, you can:
- Click on an assignment name to open the Assignment Report for that assignment. Learn more about the Assignment Report.
- Click on a student’s name to open their Student Progress Report.
Teacher Preferences
Teachers can customize their settings by accessing their Teacher Preferences.
- Account Settings: update personal information
- Preferences: update time zone, school zip code, curriculum, grade preferences, state standards, and school terms.
- Feature Settings: set defaults for Test Mode, Student Supports, and Student Score Delivery.
- Import & Sync: import or synchronize your classes with your LMS.
Learn more about updating Teacher Preferences here.
Frequently Asked Questions
Q: I don’t see my Class Card(s)—what should I do?
A: Click Import Classes on the My Courses homepage by clicking your name in the lower left-hand corner to access Import/Sync. You can also synchronize your LMS connection to ensure all courses are visible.
Q: Where do I find assignments now that the interface has changed?
A: Assignments are now located inside each course. Click the Assignment Icon on the Class Card to view Assignments.
Q: How do I view reports for individual students?
A: Click the Report Icon on the Class Card to open Class Reports. From there, select a student to access the Student Detail Report.
Didn't Find What You Were Looking For?
.avif)
Charitable Number: 83-4228740