
Creating Custom Problem Sets with Existing Problems in the Content Library
Creating Custom Problem Sets with Existing Problems in the Content Library
Custom problem sets allow teachers to combine questions from the ASSISTments Content Library into collections that fit their specific classroom goals. This is helpful when you want to:
- Target certain standards or skills.
- Mix problems from multiple lessons.
- Create differentiated sets for students with different learning needs.
Create a Custom Problem Set
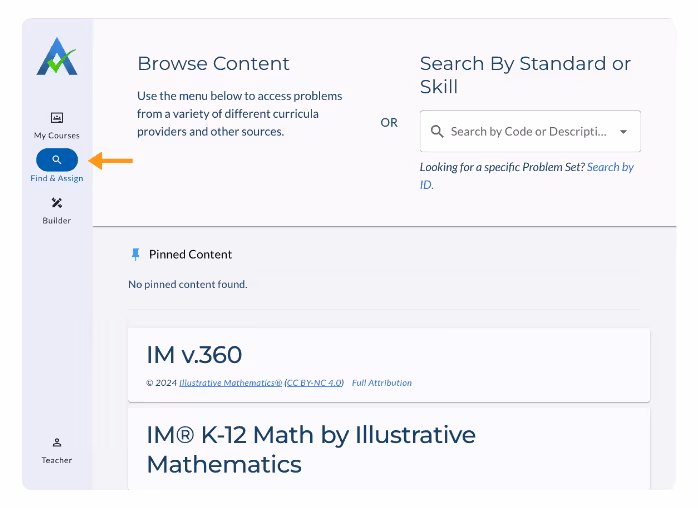
- From the left-hand menu, select Find & Assign.
Use Browse Content or Search by Standard to locate problems.- In Search by Standard, type a keyword or Common Core code.
- Select the appropriate standard from the dropdown menu.
%2520(Video%2520Collage)%2520(7).gif)
- Review the search results. Problems that align with your search will appear.
- Use filters such as Curriculum and/or Item Type to refine results.
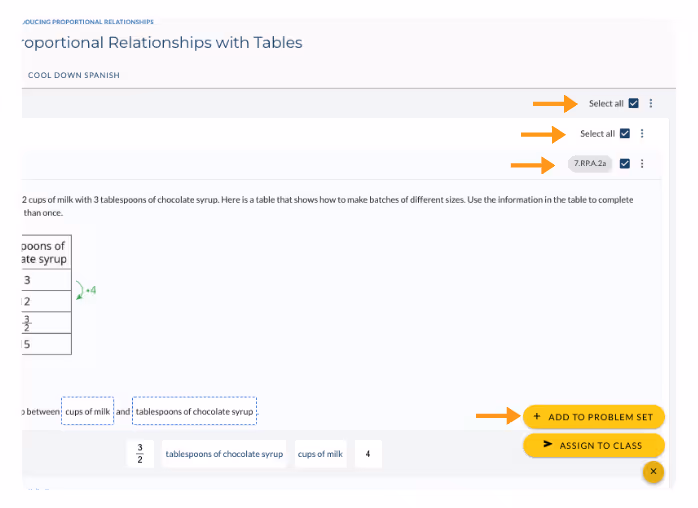
- Select the checkboxes beside the problems you want to include.
Click “Assign # Problems” and choose “Add to My Problem Set”.
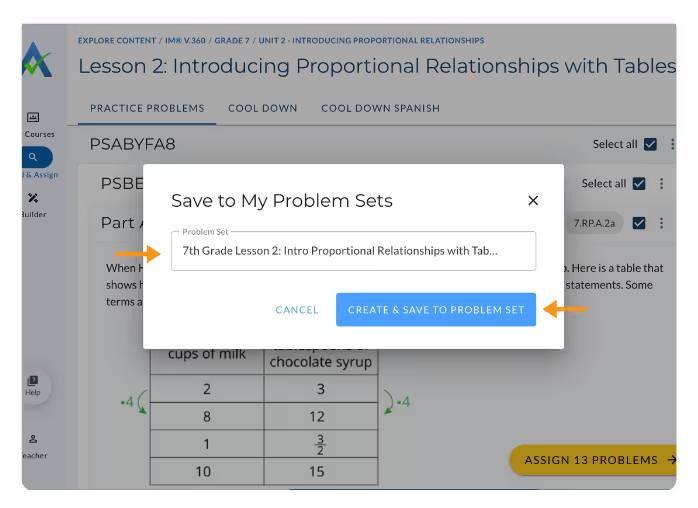
- Enter a title for your new problem set and click “Create and Save To Problem Set”.
- Your new set now appears in My Problem Sets under Builder.
Add Problems to an Existing Problem Set
%2520(Video%2520Collage)%2520(6).gif)
- From the left-hand menu, click Find & Assign.
- Locate additional problems by browsing or searching by standard.
- Select the checkboxes beside the problems you’d like to add.
- Click the arrow next to “Assign # Problems” to Class” and choose Save “Add to My Problem Set” Select the existing problem set you’d like to add problems to, then click “Save to Problem Sets”.
Assigning Your Custom Set:
.gif)
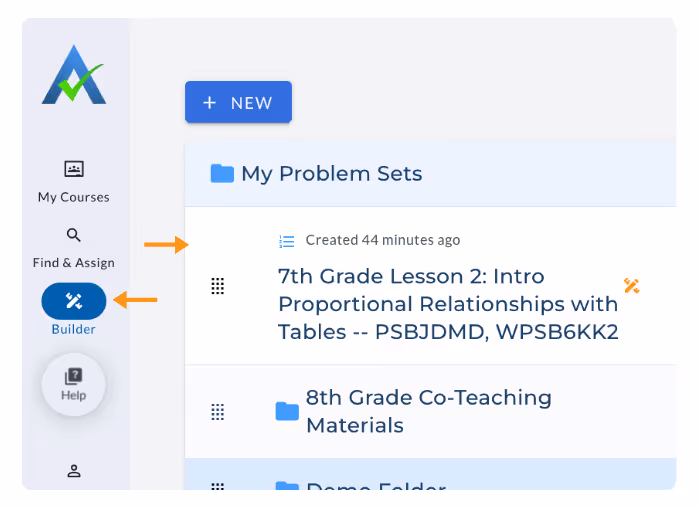
- On the left-hand menu, select Builder.
- Click My Problem Sets.
- Locate and select your problem set.
- Click Assign at the bottom of the screen.
- Choose Assign to Class and follow the prompts for ‘Assign Time Options’.
Organize Custom Problem Sets
To keep your workspace organized, you can create folders or subfolders within My Problem Sets. This also allows you to easily share content with colleagues.
Create a Folder
- On the left-hand menu, select Builder.
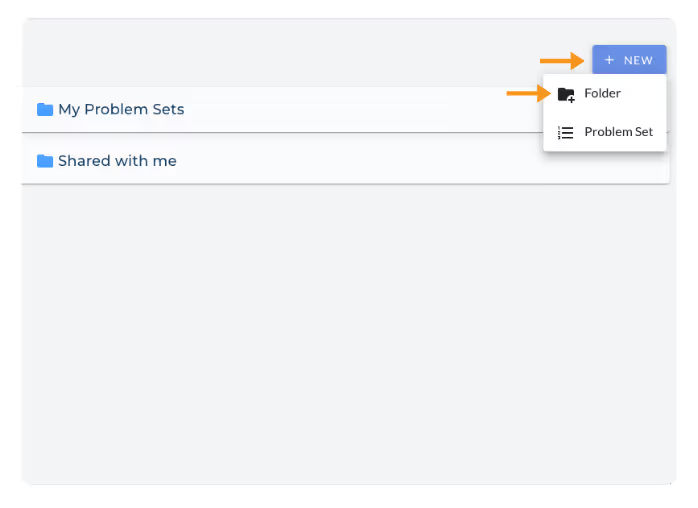
- Click the + New button and select Folder at the top right of My Problem Sets.
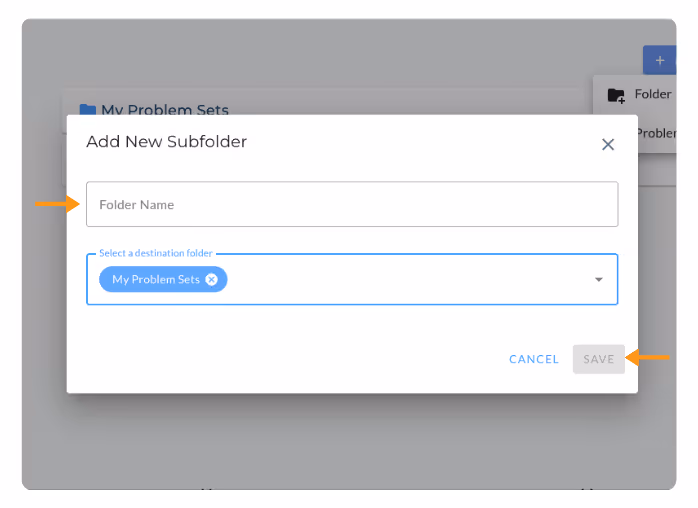
- Name your folder and click Save.
Move Problem Sets to Folders
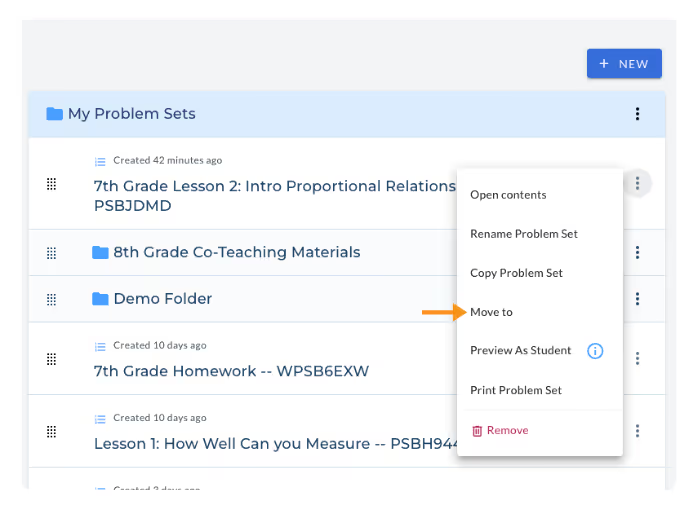
- Click the ⋮ (triple dots) beside a problem set and select Move To.
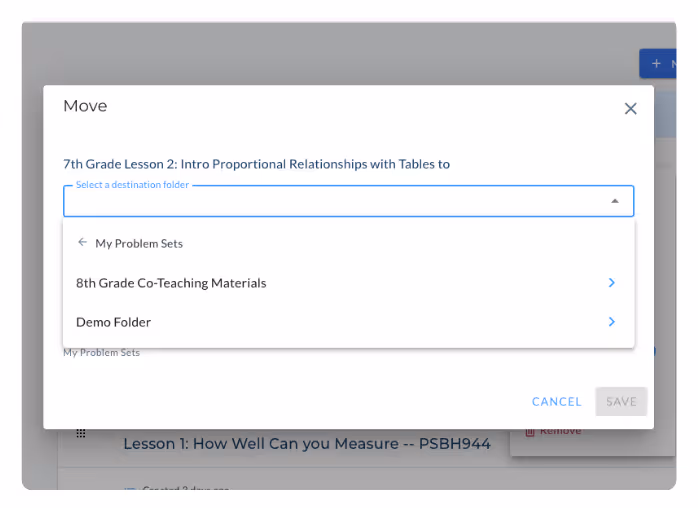
- Choose a folder or subfolder from the dropdown list.
- Click Save to move it.
- Tip: You can drag to reorder problem sets within a folder, but not between folders.
Creating and organizing custom problem sets helps teachers deliver more intentional, differentiated instruction while saving time planning future lessons.
Creating Custom Problem Sets with Existing Problems in the Content Library
Custom problem sets allow teachers to combine questions from the ASSISTments Content Library into collections that fit their specific classroom goals. This is helpful when you want to:
- Target certain standards or skills.
- Mix problems from multiple lessons.
- Create differentiated sets for students with different learning needs.
Create a Custom Problem Set
- From the left-hand menu, select Find & Assign.
Use Browse Content or Search by Standard to locate problems.- In Search by Standard, type a keyword or Common Core code.
- Select the appropriate standard from the dropdown menu.
- Review the search results. Problems that align with your search will appear.
- Use filters such as Curriculum and/or Item Type to refine results.
- Select the checkboxes beside the problems you want to include.
Click “Assign # Problems” and choose “Add to My Problem Set”.
- Enter a title for your new problem set and click “Create and Save To Problem Set”.
- Your new set now appears in My Problem Sets under Builder.
Add Problems to an Existing Problem Set
- From the left-hand menu, click Find & Assign.
- Locate additional problems by browsing or searching by standard.
- Select the checkboxes beside the problems you’d like to add.
- Click the arrow next to “Assign # Problems” to Class” and choose Save “Add to My Problem Set” Select the existing problem set you’d like to add problems to, then click “Save to Problem Sets”.
Assigning Your Custom Set:
- On the left-hand menu, select Builder.
- Click My Problem Sets.
- Locate and select your problem set.
- Click Assign at the bottom of the screen.
- Choose Assign to Class and follow the prompts for ‘Assign Time Options’.
Organize Custom Problem Sets
To keep your workspace organized, you can create folders or subfolders within My Problem Sets. This also allows you to easily share content with colleagues.
Create a Folder
- On the left-hand menu, select Builder.
- Click the + New button and select Folder at the top right of My Problem Sets.
- Name your folder and click Save.
Move Problem Sets to Folders
- Click the ⋮ (triple dots) beside a problem set and select Move To.
- Choose a folder or subfolder from the dropdown list.
- Click Save to move it.
- Tip: You can drag to reorder problem sets within a folder, but not between folders.
Creating and organizing custom problem sets helps teachers deliver more intentional, differentiated instruction while saving time planning future lessons.
Didn't Find What You Were Looking For?
.avif)
Charitable Number: 83-4228740